We use cookies to make your experience better. To comply with the new e-Privacy directive, we need to ask for your consent to set the cookies. Learn more.

How do I wire a new foot control to my lead
How to Wire a New Foot Control to Your Lead – Step-by-Step Guide
When wiring a new foot control to your lead, it's important to follow proper safety and installation procedures. The following instructions are specifically for two-wire leads when fitting a DIY-type foot control. Please note that this guide is intended for qualified electricians or individuals with electrical experience. Always ensure your work meets safety standards.
Step 1: Unplug the Power Supply
Before beginning any electrical work, ensure that the power supply is completely unplugged to avoid any risk of electric shock. This is a critical safety step to protect yourself and your equipment.
Step 2: Cut the Lead and Prepare the Wires
Once the power is disconnected, proceed with the following steps:
- Cut the Lead: Use a suitable tool to cut the lead as close to the old foot control as possible. This will make the installation of the new foot control easier and ensure a clean connection.
- Slide the Lead Protector: Slide the lead protector over the cut end of the lead and move it up the wire. This will help prevent any damage to the wires and maintain the integrity of the installation.
- Prepare the Wire Ends: Carefully strip the insulation off the wire ends to expose the bare wires. Make sure you leave enough wire exposed for the connections.
- Attach Spade Connectors: Attach the spade connectors to the bared wire ends. These connectors will allow a secure and reliable connection to the foot control. Ensure they are properly crimped or secured in place.
- Cover with Heat Insulation Tubes: Slide heat insulation tubes over the wire ends to ensure the wires are properly insulated and to prevent any short circuits or damage from occurring during use.
Step 3: Remove the Back Cover of the New Foot Control
Using a screwdriver, remove the three screws securing the back cover of the new foot control. This will allow access to the internal connections where the wires will be attached.
Step 4: Attach the Spade Connectors to the Foot Control
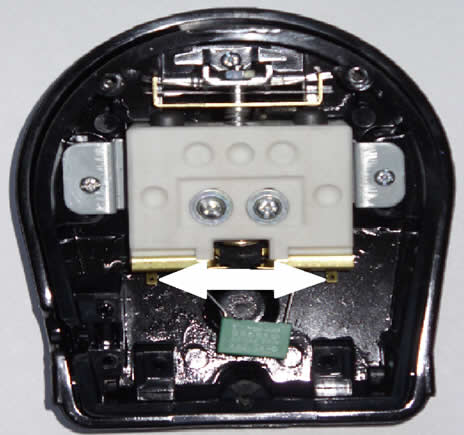
With the foot control's back cover removed, proceed to connect the wires to the foot control:
- Insert the Spade Connectors: Push the prepared spade connectors onto the two spades inside the foot control. Ensure the connections are secure and the wires are properly seated.
Step 5: Secure the Lead Inside the Foot Control
Once the spade connectors are attached, lay the lead out through the slot in the foot control body. Use the clamp inside the foot control to secure the lead in place. Then, screw the clamp down to hold the lead firmly.
Step 6: Replace the Bottom Cover of the Foot Control
Once everything is connected and secure, replace the bottom cover of the foot control. Use the screws to fasten the cover back in place, ensuring everything is tightly sealed and secure before proceeding with use.
Important Safety Note
These instructions are provided as a guide and should only be followed by qualified electricians or experienced individuals who are familiar with electrical installations. This is not a complete guide, and you must refer to the manufacturer's manual and safety guidelines to ensure proper installation and compliance with local regulations.
By following these steps, you can successfully wire a new foot control to your lead, ensuring reliable performance and safety. Always prioritize safety when working with electrical components.
THIS INFORMATION ONLY APPLIES TO A TWO-WIRE LEAD WHEN BEING FITTED TO THE DIY TYPE FOOT CONTROL